Texture injection molding refers to the practice of building controlled surface patterns directly into the mold cavity so every molded part exhibits identical tactile and visual characteristics from the first shot onward.
Unlike secondary surface treatment methods such as painting or pad printing, this approach integrates the pattern in a single molding operation, achieving high repeatability at essentially zero marginal cost per part.
It’s important to distinguish between a smooth surface finish and a deliberate texture. Every injection molded part has some surface topography, even when it appears polished.
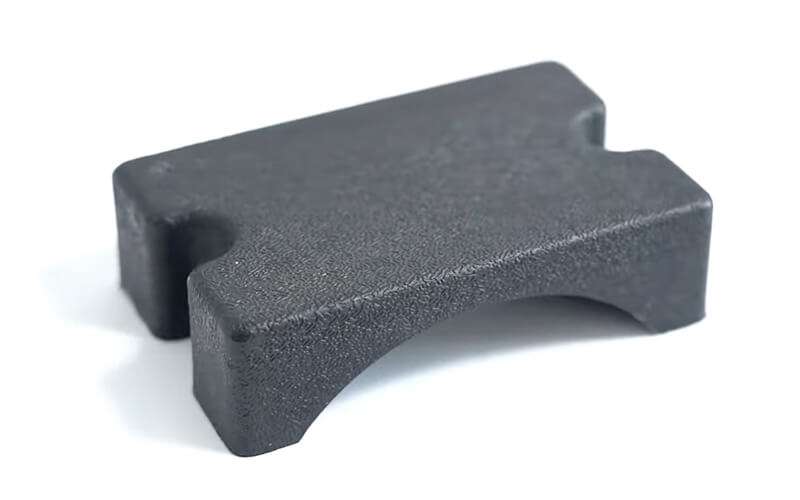
A texture is a visible, tactile micro- or macro-pattern engineered for specific aesthetic or functional purposes.
Consider the contrast between a glossy polycarbonate light guide requiring optical clarity (SPI A-1) and a matte, leather-like ABS interior automotive panel—both are injection molded parts, but texture fundamentally changes their appearance, touch, and performance.
What Is Surface Texture in Injection Molding?
Surface texture is the 3D micro-geometry of a molded part—the peaks, valleys, and waviness—resulting from the mold surface and the molding process conditions.
This topography directly mirrors the mold’s texture but is influenced by resin flow dynamics, shrinkage (typically 0.5-2% for thermoplastics), and cooling rates.
Textures can be:
- Regular: Repeatable geometries like checkerboards, ribbed lines, or dot matrices
- Irregular: Patterns mimicking natural stone, leather grain, or sand-like finishes
Key terminology to describe surface textures includes:
- Roughness (Ra): Arithmetic average of small-scale features, measured in micrometers
- Waviness: Larger, more widely spaced undulations from tool marks or process variations
- Lay: The dominant directional pattern orientation affecting light reflection and grip
In texture injection molding, the mold’s negative texture is permanently machined or etched into hardened steel molds or aluminum tooling.
When process parameters remain consistent, the texture reproduces on every shot with high repeatability.
Surface texture ties directly to product requirements—optical clarity, friction coefficient, cleanability, and perceived quality—and should be specified as carefully as dimensions and tolerances.
Benefits of Using Texture in Injection Molding
Well-designed textured surfaces improve aesthetics, ergonomics, performance, and manufacturability at essentially zero marginal cost per part once the mold is built.
Statistically, textured molds can help conceal up to 80% of minor flow lines and color variations across batches.
Visual benefits:
- Hiding flow lines, weld lines, sink marks, and minor scratches
- Concealing surface imperfections and color variation between batches
- Creating premium-looking surfaces that mimic leather, brushed metal, or wood grain
- Enhancing visual appeal and brand identity
Functional benefits:
- Increased grip on handles and knobs (good grip characteristic improvements of 20-50%)
- Reduced glare from bright light with matte finish options
- Better fingerprint resistance on consumer electronics housings
- Improved paint adhesion and adhesive bond strength through mechanical interlocking
- Light diffusion for backlit icons and displays
Texture can impact part reliability. Certain finishes reduce stress concentrations at the surface, while overly aggressive deep textures may trap contaminants or make cleaning more difficult.
Medical, automotive, and consumer applications each have specific context requirements.
Additionally, correct finishes help stabilize perceived quality across multiple production batches, even when slight process drifts occur.
Common Mold Texture Types and How They Are Created
Texture injection molding relies on specific texturing processes to generate controlled finishes on the mold material, ranging from mirrored surfaces to deep, tactile grains.
Each method has distinct mechanisms, outputs, applications, and cost implications.
Mold Surface Textures Produced by Polishing
SPI Category A finishes are created through multi-step polishing sanding of hardened tool steel with successively finer abrasives, culminating in fine diamond powder or diamond paste to achieve a mirror luster.
- Process: Progressive abrasion from coarser grits to diamond paste (<1µm)
- Result: Glossy, highly reflective plastic parts nearly free of tool marks
- Applications: Light pipes, lenses, cosmetic covers, plastic mirrors, and any part where optical clarity is vital
- Considerations: Time-intensive and costlier than basic texturing; polished surfaces tend to show defects like splay, flow lines, and minor blemishes more readily
The work creates a non-directional, fluid reflection ideal for premium optical components. However, gating, venting, and process controls must be carefully optimized because these surfaces amplify any injection molding defects.
Mold Surface Textures Made with Sandpaper and Grit Stone
Ultra fine grit sandpaper (SPI Category B) and grit sanding stones (SPI Category C) create semi gloss finish to matte surfaces with controlled roughness levels.
- Sandpaper: Typically 320-600 grit, creating a soft sheen
- Grit stone: Produces rougher, more aggressive textures using fine stone powder
- Lay patterns: Single-direction sanding creates directional lay; cross-sanding produces softer appearance
These finishes are common for consumer housings, appliance panels, and structural components where a subtle sheen or low-gloss appearance is desired without the cost of diamond polish.
Grit stone textures conceal machining marks effectively for industrial-looking matte parts.
Mold Surface Textures from Media Blasting
Media blasting (SPI Category D) propels abrasive media at high pressure air against the metal surface to generate a uniform, non-directional matte or satin finish.
| Media Type | Effect | Common Applications |
|---|---|---|
| Glass beads | Soft satin finish | Enclosures, consumer electronics |
| Aluminum oxide | Aggressive matte | Industrial panels, dashboards |
| Plastic beads | Fine, controlled texture | Delicate surfaces |
| Wet abrasive media | Controlled depth | Precision applications |
Bead blasting is relatively fast and cost-effective for large surface areas. Air pressure and distance control are critical for consistent texture depth.
Limitations include difficulty masking sharp concave corners precisely and potential for spray pattern inconsistencies on curved surface areas.
EDM and Satin Textures
Electrical discharge machining (spark erosion) naturally leaves a “sparked” surface with characteristic micro-craters whose scale depends on EDM parameters.
This process excels in deep thin slots, sharp corners, and hard-to-polish areas.
- Controlled EDM textures can mimic fine matte or slightly rough technical surfaces
- Micro-crater size (10-50 µm) is controlled by pulse duration and energy
- Useful for any metal hardness, including hardened steel molds
Satin finishes combine blasting and fine polishing using a rotary tool or diamond burrs to achieve a flat, low-glare surface.
These are often chosen for hand-contact areas on consumer products where both cleanability and a premium feel are desirable.
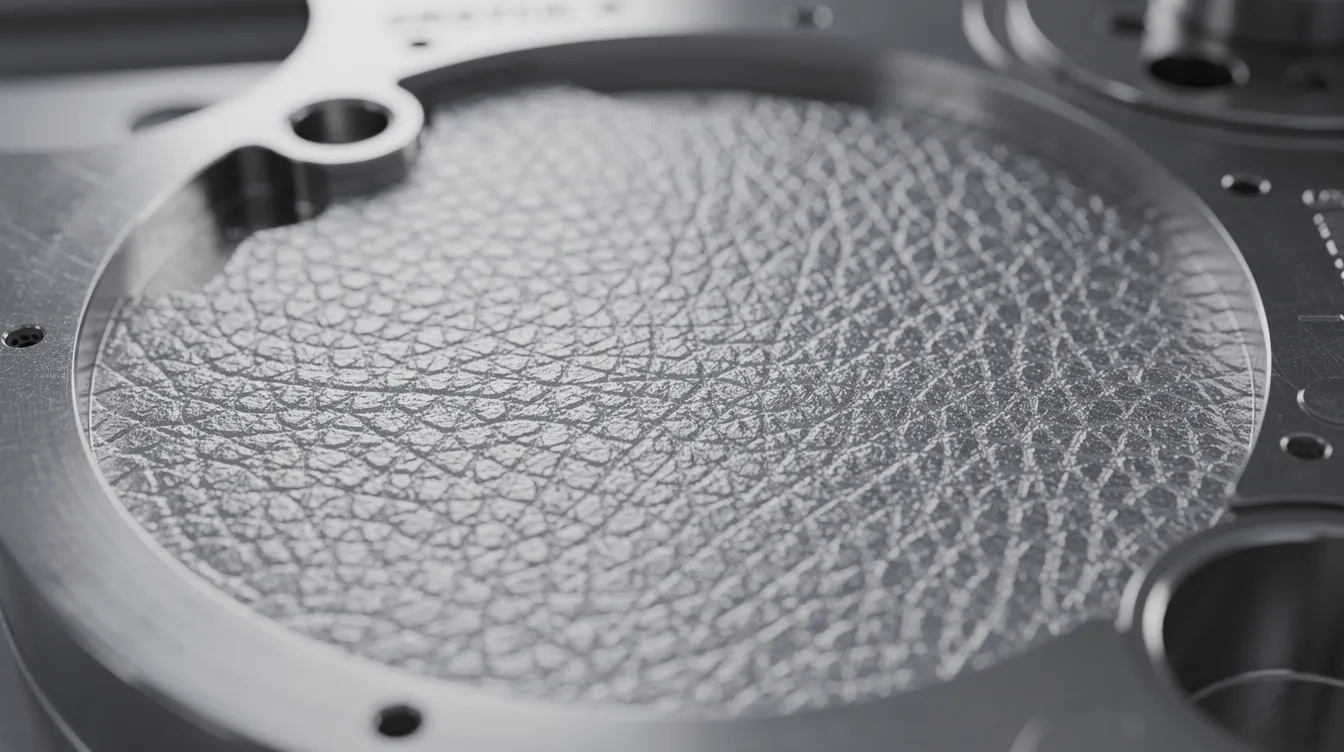
Chemical Photo Etching for Textured Molds
Chemical photo etching uses a light sensitive chemical process to create complex textures:
- Apply photoresist to the mold surface
- Expose with UV through a film mask defining the desired pattern
- Develop the pattern
- Immerse in acid bath (e.g., ferric chloride) for controlled-depth etching
This method allows very detailed, organic patterns—leather grains, wood grain, stone effects—indexed by texture codes like Mold Tech textures (MT-11000 series). Limitations include line-of-sight access requirements and multiple masking cycles for multi-level patterns.
Real-world applications include automotive dashboards, center consoles, and electronic device housings using chemical etching for consistent, branded tactile experiences.
Laser Etching and Advanced 3D Textures
Laser texturing uses 5-axis systems following CAD texture maps to ablate the mold surface layer by layer. Laser etching enables:
- Extremely fine microtextures (down to 1-10 µm)
- Anisotropic patterns and gradient textures
- LIPSS (laser-induced periodic surface structures) and DLIP (direct laser interference patterning)
- Precise registration on freeform surfaces and undercuts
The process is more expensive (2-5x chemical etching) and requires detailed digital preparation. However, laser-textured molds are increasingly used for premium consumer electronics, sports equipment, and high-end automotive trim where unique signature textures support brand identity.
Surface Finish Standards: SPI and Texture Categories
In North America and many global programs, the Society of the Plastics Industry (SPI) finish standard is widely used to describe mold and part surface quality.
The plastics industry relies on these SPI surface finish grades as a common language between design, tooling, and molding suppliers.
The SPI system includes 12 grades across four categories:
| Category | Description | Ra Range (µm) |
|---|---|---|
| A (1-3) | Glossy, diamond-polished | 0.012-0.1 |
| B (1-3) | Semi-gloss, sanded | 0.1-0.4 |
| C (1-3) | Matte, stoned | 0.4-1.6 |
| D (1-3) | Textured, blasted/etched | 0.8-3.2+ |
For highly textured surfaces, teams often combine SPI base finish calls with proprietary pattern codes to eliminate ambiguity.
Glossy (SPI A) Finishes
SPI A-1, A-2, A-3 represent progressively less perfect mirror finishes achieved with successively coarser diamond polishing. A-1 achieves Ra 0.012-0.025 µm—the finest mirror polish.
Applications include clear lenses, light pipes for LED indicators, high-end cosmetic covers, and reflective interior trim. These finishes require hardened steel molds and meticulous maintenance to avoid scratches.
Semi-Gloss (SPI B) Finishes
SPI B grades use fine sandpaper or emery cloth to produce a smooth but non-mirror surface, yielding a soft sheen on plastic materials like ABS and PC/ABS.
Semi-gloss is a common default for consumer housings, small appliance covers, and medical device enclosures. B-level surfaces show weld lines and minor flow marks less prominently than A-level high gloss finishes, balancing appearance, defect hiding, and cost.
Matte (SPI C) Finishes
SPI C grades are produced with stones or coarser abrasives, yielding a clearly non-reflective, flat appearance. Matte finish options effectively mask machining marks and minor cosmetic issues.
These are widely used for industrial components, under-the-hood automotive parts, and areas not visible to the end user. Note that matte surfaces can slightly increase friction and may collect dirt more readily—evaluate against cleaning requirements.
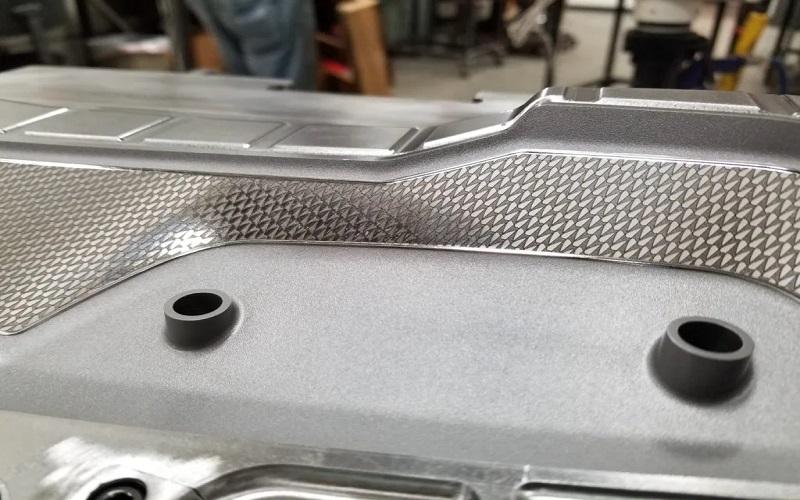
Textured (SPI D) and Patterned Finishes
SPI D standards refer to uniformly textured surfaces created by blasting. For patterned textures like leather grains, engineers specify both the SPI baseline finish and a named texture standard.
Example specification: “SPI C-1 + leather texture code MT-11520 at 0.2mm depth”
This precision ensures toolmakers worldwide can reproduce the desired texture consistently.
Design Considerations for Texture Injection Molding
Adding texture affects draft angle, wall thickness, gate placement, and ejection design. These decisions must be made at the earliest design stages, not after tools are cut.
Designers must determine whether a texture is primarily aesthetic, primarily functional, or both. Incorporating texture zones—textured grip regions, smooth sealing surfaces, logo panels—may require step changes in draft and careful transitions.
Consider a handheld device where sidewalls are textured for grip, the front bezel is semi-gloss, and the display window is high-polish—all achieved in one tool with proper planning.
Aesthetics vs. Function
Decorative textures are chosen for brand identity, perceived quality, and visual differentiation. Industrial design and marketing teams often drive these decisions.
Functional textures serve specific purposes:
- Light textures for scattering (backlit icons)
- Microgrooves for fluid management
- Grip patterns for ergonomics
- Surfaces that hide plastic flow creases
The best surface texture often serves both roles—a distinct grain that also hides fingerprints on black PC/ABS laptop housings, for example. Prototype textures using 3D-printed plaques or off-the-shelf texture plaques before freezing tool design.
Material Selection and Its Impact on Texture
Different resins replicate mold surface textures with varying fidelity:
| Material Type | Texture Replication | Considerations |
|---|---|---|
| ABS, PC/ABS | Excellent | Sharp detail reproduction |
| PP, PE | Good | Low viscosity helps shallow textures |
| Glass-filled PA | Moderate | Fillers can dull edges |
| TPE, LSR | Fair | Softens sharp microtextures |
Soft metals in fillers and flame retardants increase surface drag, potentially causing flow marks. White and transparent materials show less visual benefit from heavy textures—dark or solid-colored plastics maximize texture visibility.
Draft Angle and Texture Depth
Texture depth and draft angle are tightly linked. Deeper textures need larger draft angles to allow parts to eject cleanly without scuffing, tearing, or sticking to the tool wall.
General guidance:
- Light etched textures: Modest extra draft (0.5-1° per 0.1mm depth)
- Deep leather or wood grain: May require 4-7° depending on pattern and resin
- Aggressive textures can increase ejection forces by 10-30%
Insufficient draft is a common cause of production problems: drag marks, gloss variation, and part cracking during ejection. Early collaboration between industrial designers, mechanical engineers, and toolmakers is essential.
Process Parameters: Temperature and Injection Velocity
The molding process parameters directly affect texture replication:
- Higher mold temperatures help resin flow into fine texture features
- Faster injection velocities (50-150 mm/s) improve detail reproduction and surface depth
- Inadequate venting causes incomplete fills in deep patterns
Overly high injection speeds or insufficient cooling can increase gloss locally or cause burn marks and splay. Process sheets should specify mold surface temperature ranges appropriate for the selected texture and material combination.
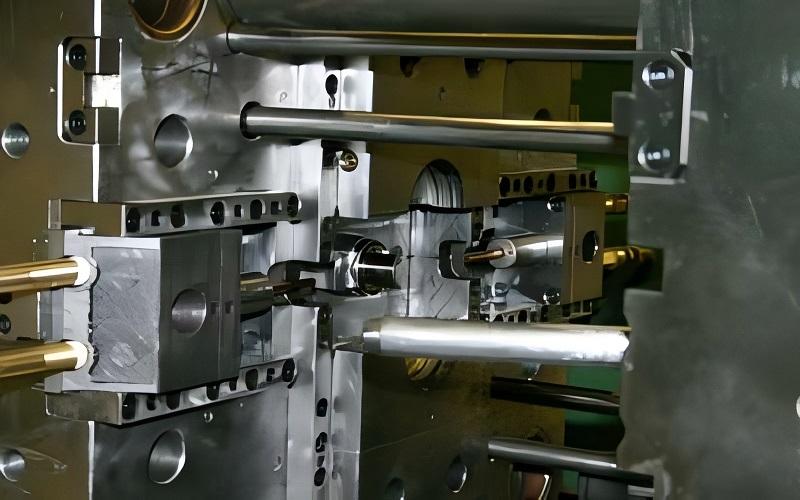
Manufacturing Workflow for Textured Injection Molds
The typical workflow: machine the mold cavity, perform EDM operations, prepare the surface, apply texture (via blasting, chemical etching, or laser), then inspect and protect the textured surface.
Once texture is added, heavy re-machining destroys the pattern. All dimensional features should be verified prior to texturing.
Close coordination between mold makers and external texture vendors is essential, particularly for large steel inserts or complex multi-cavity tools.
Mold Preparation and Cleaning
Thorough cleaning removes oil, cutting fluids, and residues using solvents, ultrasonic cleaning, or vapor degreasing before texturing.
Remaining contaminants cause uneven etching or inconsistent blasting, resulting in blotchy textures that cannot easily be corrected.
After cleaning, tool surfaces are inspected under magnification and sometimes pre-finished to ensure a uniform base, supporting long mold life.
Masking, Corrosion Protection, and Target Areas
Only selected areas receive texture. Precision masking protects:
- Shut-offs and parting lines
- Ejector pin lands
- Smooth sealing faces
In chemical etching, unprotected areas must be sealed against acid to preserve geometry and prevent corrosion.
Mask design also creates sharp texture boundaries, transitions, or “texture windows” for logos and functional features needing corrosion resistance.
Applying and Verifying the Texture
The texturing step uses the chosen method, with time, media, and parameters determining final depth and pattern clarity. After completion:
- Clean mold surfaces again
- Inspect visually against standard plaques or reference codes
- Perform dimensional checks if needed
- Mold sample shots to validate reproduction with specified resin
Tiny particles or residue must be removed before production. Sample shots verify that texture reproduces as intended and allow fine-tuning of gloss and visual uniformity.
Conclusion
Ultimately, texture injection molding is where engineering precision meets human perception.
It transforms a standard plastic component from a raw industrial product into a refined consumer experience.
By integrating texture directly into the mold cavity, you move beyond mere aesthetics; you achieve a permanent, durable, and cost-effective surface that performs as well as it looks.
FAQ – Texture Injection Molding
Does adding a texture to my mold significantly increase tooling cost?
- Cost depends heavily on texture method and surface area: simple blasting adds 5-10% to tooling cost, while detailed laser etching on large surfaces can add 20-50%
- Per-part cost usually does not increase because the textured finish forms in the same molding cycle
- When requesting quotes, provide SPI finish calls or specific texture codes and indicate approximate percentage of part surface to be textured
- Minor changes between similar texture codes are generally cheaper than completely stripping and reworking a texture
Can I change or remove a texture after the mold has been built?
- Minor adjustments (lightening, blending, reducing depth) are sometimes possible via repolishing or re-etching
- Completely removing deep patterns usually requires machining and retexturing, which removes steel and may affect dimensions
- Consider texture trials on separate test inserts when aesthetic direction is uncertain
- Freeze texture decisions only after stakeholders have physically reviewed molded samples in intended color and material
How is texture injection molding different from post-processing methods like painting or printing?
- Integrated textures cannot peel or wear off independently of the base material
- Post-processing adds per-part cost, cycle time, and additional quality checks
- Secondary methods can add localized effects without changing the tool
- For high-volume production, integrated texture is typically more economical and durable
How early in the design process should I decide on textures?
- Texture decisions should be made before finalizing industrial design and before tool design begins
- Late changes trigger tool modifications, validation shots, and schedule slips
- Incorporate texture discussions into early DFM reviews and concept freeze meetings
- Having agreed texture specifications in design release documentation helps all suppliers quote and build correctly
What is the best way to evaluate a texture before committing to mass production?
- Request molded sample plaques with proposed texture and material combination rather than judging from steel samples or catalog photos
- Check samples under realistic lighting in intended color—gloss and visibility change dramatically between light and dark resins
- Perform simple user tests: evaluate grip, fingerprint visibility, ease of cleaning, and subjective quality perceptions
- Document feedback and request texture refinement iterations on test inserts before applying final patterns to production cavities