Choosing the right wall thickness for 3D printing is key to strong and durable 3D prints.
This guide will show you how to determine the best wall thickness 3D printing for your project, covering different materials and printing methods.
Importance of Wall Thickness in 3D Printing
Wall thickness, the width of the outer walls or shells of a 3D-printed object, significantly impacts the quality and strength of your printed parts.
Thinner walls can lead to fragile components, making them prone to breakage and deformation during use.
On the other hand, thicker walls enhance the hardness and strength of the object, contributing to its overall durability and smooth surface finish. Choosing the proper wall thickness is crucial for achieving structurally sound prints that meet functional requirements, especially when optimizing top and bottom layers.
The purpose of the print heavily influences the required wall thickness. Functional parts, such as gears or mechanical components, typically need thicker walls to ensure structural integrity. In contrast, decorative items might not require as much strength and can therefore have thinner walls.
Inadequate wall thickness can compromise a part’s stability, leading to issues like holes, weak points, or even complete printing failures. Understanding wall thickness and its influencing factors helps in making informed decisions to enhance the quality and durability of your 3D-printed objects.
Minimum Wall Thickness Guidelines
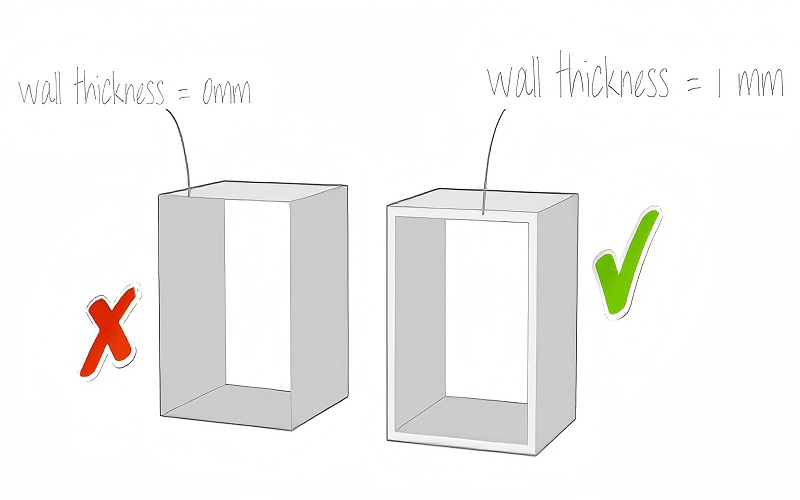
Minimum wall thickness is defined as the thinnest wall that can be printed without losing quality and strength. Maintaining the minimum wall thickness ensures the functionality and structural integrity of 3D-printed parts.
Different materials and printing processes have specific guidelines for minimum wall thickness, which can significantly affect print quality and durability.
Guidelines for wall thickness:
- Flexible materials, such as flexible PLA, need a minimum wall thickness of at least 2 mm.
- Non-flexible materials like PLA can have a minimum thickness of 1 mm.
- Larger models generally necessitate thicker walls to maintain stability.
- Smaller models can utilize thinner walls.
These basic guidelines help in achieving the optimal wall thickness to calculate minimum wall thickness and the recommended minimum wall thickness for your project.
FDM (Fused Deposition Modeling)
In FDM printing, the minimum wall thickness guidelines are:
- At least double the nozzle diameter for optimal results.
- For common materials like PLA, a minimum wall thickness of at least 1.5 mm is recommended.
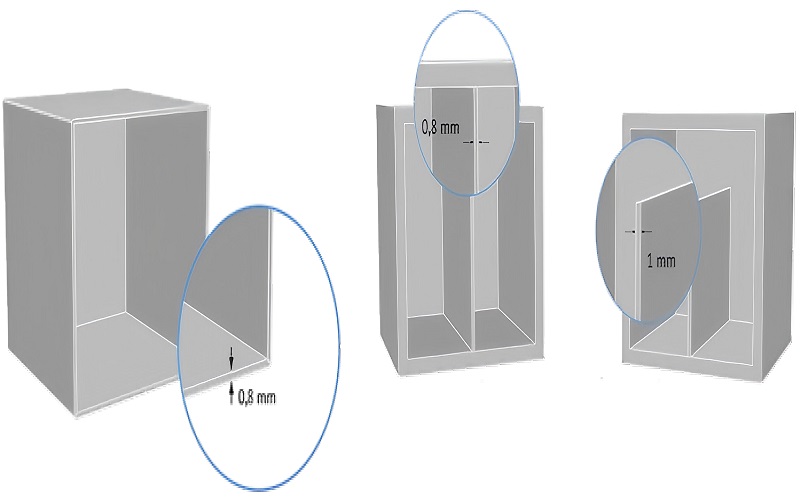
- Supported walls can have a minimum thickness of 0.8 mm.
- Unsupported walls require at least 1.2 mm to maintain structural integrity.
When printing the inner wall first, a wall thickness of 1.2 mm is recommended to ensure the stability and quality of the printed part. Adhering to these guidelines ensures high-quality prints with FDM technology.
SLA (Stereolithography)
For SLA printing, a minimum wall thickness in the range of 0.5 mm to 1 mm is commonly recommended for achieving a balance between detail and strength.
Specifically, a minimum wall thickness of 0.8 mm is advised to ensure the quality and integrity of the printed part while maintaining the desired detail and surface finish.
The success of SLA prints heavily relies on appropriate wall thickness.
SLS (Selective Laser Sintering)
For SLS printing, the minimum recommended wall thickness is set at 1.0 mm to ensure sufficient strength and durability. This guideline applies across various materials used in SLS printing, providing the necessary balance between structural integrity and material efficiency.
For materials like Nylon, a maximum recommended wall thickness of 2.5 mm maintains performance without compromising structural integrity.
Maximum Wall Thickness Considerations
The recommended maximum wall thickness for most 3D printing processes is typically between 2 mm and 3 mm, which balances structural integrity with material efficiency.
The maximum wall thickness is defined as the thickest wall that can be printed efficiently without compromising other print characteristics.
Larger models require thicker walls for stability, while smaller models can successfully utilize thinner walls without compromising performance, especially with high precision ABS.
Layer height influences wall thickness in the following ways:
- Larger layer heights require thicker walls for stability and strength.
- The final thickness is influenced by the order in which walls are printed; for example, printing the outer wall first may necessitate thicker configurations to mitigate warping.
- Excessive wall thickness increases material use, impacting print costs and time. Additionally, different layers can affect the overall structural integrity.
Warping can occur if different sections of a print cool at varying rates, leading to uneven shrinkage if wall thickness is not appropriately managed.
Models with larger sizes generally require thicker walls to prevent warping, while smaller models can be designed with thinner walls to optimize material use. Print settings play a key role in this balance.
Higher print speeds may require thicker walls for proper adhesion and structural stability. Balancing structural needs with printing material efficiency is crucial when determining the maximum wall thickness, as it directly influences print performance and final product quality. Important considerations include material properties and design complexity.
Supported vs. Unsupported Walls
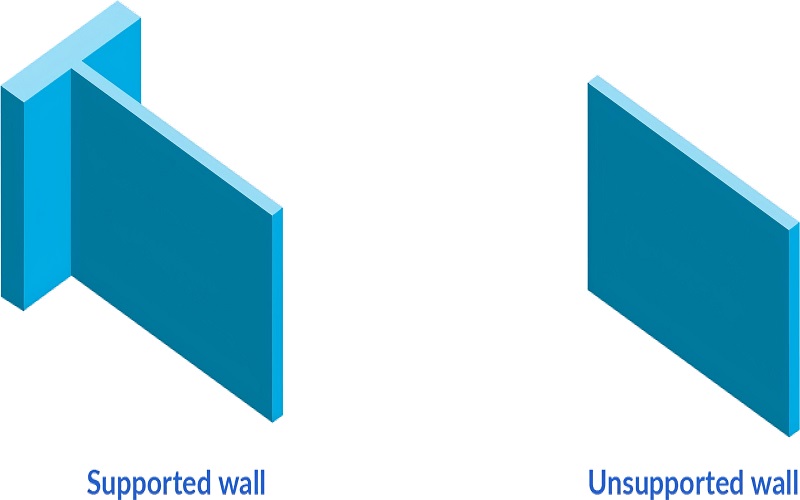
Supported walls are structures that have additional structural support during the printing process, which allows for thinner designs and reduces the risk of deformation.
In contrast, unsupported walls rely on their own integrity and require thicker designs to maintain strength and prevent collapse.
The main difference between supported and unsupported walls is the amount of material needed to ensure structural integrity. Recognizing these differences optimizes material usage and print success.
Supported Walls
Supported walls are connected to other parts and may be reinforced by support structures. The primary benefits and considerations include:
- Supported walls allow for thinner designs while maintaining stability during printing.
- The use of support structures affects wall thickness decisions.
- Supported walls can be thinner.
- Unsupported walls require increased thickness to maintain structural integrity.
However, improperly designed support structures can lead to insufficient support or difficulties in removal, affecting wall thickness and overall design. Careful planning of support structures optimizes wall thickness and ensures high-quality prints.
Unsupported Walls
Unsupported walls:
- Are more prone to warping and require greater thickness for stability.
- Lack sufficient support during the printing process, making them vulnerable to deformation.
- Unsupported wall should be made thicker in designs to prevent issues such as warping and collapse.
Designing unsupported walls with adequate thickness helps maintain shape and structural integrity, ensuring successful 3D-printed projects.
Vertical-Wire Diameter in 3D Printing
In 3D printing, vertical-wire diameter indicates the thickness of vertical features. This measurement plays a crucial role in the final appearance of a printed object. It is closely related to wall thickness and affects the strength and stability of printed features.
A diameter that is too small for the vertical wire can lead to fragile features. These features may become more susceptible to breaking.
Appropriate vertical-wire diameter is crucial for maintaining the structural integrity of printed parts. By considering the minimum vertical wire diameter alongside wall thickness, you can create robust and reliable prints.
Calculating Proper Wall Thickness
The right wall thickness is crucial for making designs both functional and aesthetically pleasing. Thin walls can lead to a loss of structural integrity, causing prints to fail under stress, allowing for greater design freedom. Additionally, maintaining the right thin wall thickness is essential for optimal performance.
Incorrect wall thickness compromises structural integrity and reduces print durability.
Calculating Minimum Wall Thickness
The minimum wall thickness in 3D printing is influenced by several factors. These include material properties, printer capabilities, and design requirements.
Calculating the minimum wall thickness involves considering the nozzle diameter. Layer height and material type must also be considered. Increasing wall thickness distributes stress evenly, reducing the risk of cracks.
Excessive internal stress can result from rapid cooling or inappropriate layer adhesion during printing. Gentler cleaning methods help preserve the integrity of thin walls during post-processing.
Calculating Maximum Wall Thickness
The recommended maximum wall thickness for most 3D printing processes typically ranges from 2 mm to 3 mm to maintain structural integrity while minimizing material waste.
Knowing the maximum wall thickness optimizes material use and ensures structural integrity of 3D-printed parts.
Balancing structural integrity and stronger materials efficiency is crucial, as excessive wall thickness can lead to unnecessary material usage and potential thermal stress issues in the overall structure.
Common Wall Thickness Issues and Solutions
Improperly managed wall thickness can cause common problems that affect both the quality and strength of 3D-printed parts:
- Thin walls may result in rough or uneven surface finishes, especially for high-resolution prints.
- Thinner walls may result in weak features.
- Thinner walls may cause missing components of the print.
Proper wall thickness mitigates issues like warping by reducing internal stress within the printed part.
Warping and Curling
Warping in 3D printing often occurs due to:
- Different cooling rates of printed object parts, leading to deformation.
- Walls being scaled down too thin, causing structural weaknesses that can lead to causing warping.
- Improper wall thickness, which can exacerbate warping and result in significant shape distortion.
To address printing issues:
- Thicker walls mitigate curling by providing better adhesion to the print bed.
- Mitigating warping may involve adjusting print temperature or using heated beds to ensure uniform cooling.
- Minimizing internal stress can be achieved through gradual cooling and optimizing printing speed.
Annealing as a post-processing method enhances the durability of thin-walled prints.
Internal Stress and Cracking
Excessively thick walls can lead to increased thermal stress, which raises the risk of cracks and other structural failures in the printed object. Internal stress within a printed part can cause issues.
This may result in cracking or breaking. If a model’s wall thickness is found to be inadequate, there is a significant risk of production issues, including loss of detail or structural failure.
Balancing wall thickness avoids internal stress and ensures structurally sound printed parts. Proper design and material choices can help mitigate these issues.
Post-Processing Challenges
Post-processing can be particularly challenging for thin-walled prints due to their fragility. The removal of support material during post-processing increases the risk of damage. Commonly used techniques include:
- Water jet
- Sanding
- Chemical support material removal
- Picking away residue
However, these techniques can compromise the structural integrity of thin walls due to insufficient strength.
Gentler post-processing methods preserve the smooth quality of your prints in full color sandstone, especially when using softer materials.
Tools and Software for Measuring Wall Thickness
Measuring wall thickness in 3D printing ensures the prints are strong, functional, and of high quality. Various tools and software are available to help with this task.
These tools utilize a voxel-based approach to assess a model’s volume, ensuring that the wall thickness meets the required specifications for the selected printing materials.
Some software also provides design guidelines for embossed or engraved elements, ensuring their wall thickness is adequate. Utilizing these tools can help you optimize wall thickness and achieve successful 3D printing outcomes.
Cost Implications of Wall Thickness
Excessively thick walls can result in:
- Material wastage
- Increased costs, as thicker walls need more material, leading to higher print costs
- Extended print times, since doubling the wall thickness can double the print duration
On the other hand, choosing the optimal wall thickness can significantly affect production costs and printing time. Lighter wall structures can lead to reduced production time and lower expenses. Proper wall thickness is crucial for large-scale projects to save on material usage.
Choosing the Perfect Wall Thickness for Your Project
Choosing the perfect wall thickness for your project involves considering various factors such as:
- Strength
- Durability
- Aesthetic quality
- Performance
- Appearance
When designing parts thinner walls, ensure that the part will be manufacturable later on.
For decorative items like vases, a suitable wall thickness is approximately 1 mm.
However, for functional parts, the combined thickness of adjacent walls should provide sufficient structural strength to prevent weak points. Calculating the appropriate wall thickness is crucial to ensuring the printed part is both functional and visually appealing.
Summary
In summary, wall thickness is a critical factor in 3D printing that directly affects the quality, durability, and functionality of printed parts.
By understanding the importance of wall thickness, following minimum and maximum guidelines, and addressing common issues, you can achieve optimal results in your 3D printing projects.
Choosing the perfect wall thickness for your project involves balancing structural needs with material efficiency. By considering factors such as material properties, printer capabilities, and design requirements, you can create high-quality, durable prints that meet your design and performance specifications.
Frequently Asked Questions
What is the recommended minimum wall thickness for PLA?
The recommended minimum wall thickness for PLA is 1 mm, ensuring adequate strength and print quality.
Why is wall thickness important in 3D printing?
Wall thickness is crucial in 3D printing as it directly influences the strength and durability of the final product. Ensuring adequate wall thickness prevents breakage and maintains the functionality of the printed part.
How does wall thickness affect the cost of 3D printing?
Wall thickness directly impacts 3D printing costs, as thicker walls increase material usage, leading to higher expenses and longer print durations. Careful consideration of wall thickness is essential for cost-effective production.
What are the challenges of post-processing thin-walled prints?
Post-processing thin-walled prints poses challenges due to their fragility, making them susceptible to damage, particularly when removing support material. It’s crucial to employ gentler methods to safeguard the integrity of the prints.
How can I ensure the structural integrity of thin-walled prints?
To ensure the structural integrity of thin-walled prints, maintain proper wall thickness based on nozzle diameter and layer height, and opt for gentler cleaning methods during post-processing. This approach will significantly enhance the durability of your prints.